Category: Internal

Anything that is not suppose to be shown to guests, or vendors, only corporate.

  • 📝 How to Create a Dynamic Check-In Button (Query String Passthrough)

    📝 How to Create a Dynamic Check-In Button (Query String Passthrough)


    📝 How to Create a Dynamic Check-In Button (Query String Passthrough)

    This guide shows how to build the Virtual Check-In button that takes a guest’s query string from the checkin page and passes it on to the checkinguest page.


    Step 1: Create the Button

    • Insert an Otter Button.
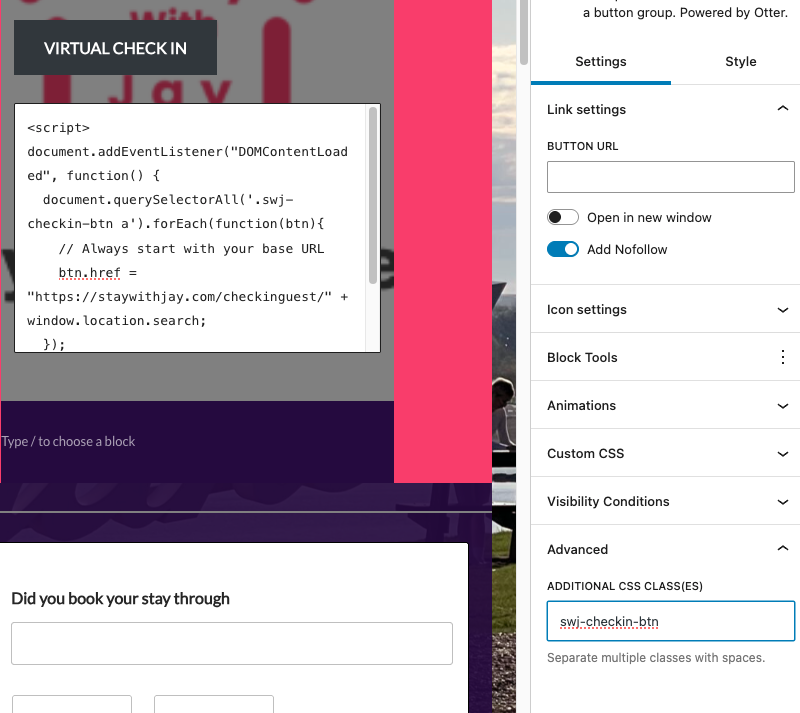
    • In Link Settings, set the Button URL to:
      https://clevelandbyjay.com/checkinguest/
      
    • Go to Advanced → Additional CSS Class(es).
    • Add:
      swj-checkin-btn
      

    (screenshot of button settings here — your Virtual Check In button)
    The 2 images below are critical into making it happen (the #signwithinthebutttonURLiskey)


    Step 2: Add the Script

    • Directly under the button, add a Custom HTML block.
    • Paste the following code:
      <script>
      document.addEventListener("DOMContentLoaded", function() {
        document.querySelectorAll('.swj-checkin-btn a').forEach(function(btn){
          btn.href = "https://clevelandbyjay.com/checkinguest/" + window.location.search;
        });
      });
      </script>
      

    (screenshot of Custom HTML block with script)


    Step 3: Save as a Pattern

    • Select both the Button and the Custom HTML block.
    • Click the 3-dot menu → Create Pattern / Reusable Block.
    • Name it:
      Virtual Check-In Button
      
    • Now, you can drop this prebuilt button+script anywhere on the site.

    (screenshot of save as pattern)


    Step 4: Confirm

    • Visit your checkin page with a query string.
      Example:

      https://clevelandbyjay.com/checkin/?wpf4043_19=123456&wpf4043_21=Booking.com
      
    • Click the button → it should redirect to:
      https://clevelandbyjay.com/checkinguest/?wpf4043_19=123456&wpf4043_21=Booking.com
      

    (screenshots of before/after with working URL)


    ✅ Result: Guests are always redirected to checkinguest/ with their unique codes preserved.


    1. Saving as a Pattern

    Yes ✅ — if you save the Button block + its CSS class (swj-checkin-btn) + the Custom HTML block with script as a Pattern (Reusable Block), both will be preserved.

    • The CSS class stays attached to the button.
    • The script inside the HTML block stays with it.
    • When you drop that pattern on a new page, it will work the same way.

    2. Validity of Custom HTML

    Yes ✅ — the <script> inside the Custom HTML block is valid on any page where it’s placed.

    • It doesn’t matter what the page slug is.
    • As long as the button has the swj-checkin-btn class, the script will find it and append the query string.
    • If you drop multiple buttons with that class on the same page, the script updates all of them.


  • Sliverado License Renewal

    Sliverado License Renewal

    https://clevelandbyjay.com/braziltrip/
  • 🔒 Tutorial: Managing WP Visibility Settings for Internal Content

    🔒 Tutorial: Managing WP Visibility Settings for Internal Content


    🔒 Tutorial: Managing WP Visibility Settings for Internal Content

    Why This Matters

    At StayWithJay.com, we sometimes create posts that are meant only for our internal team (not guests or the public). To achieve this, we use:

    1. Post Visibility Settings – ensuring posts marked as Private or restricted are only viewable by logged-in Editors and Administrators.
    2. Category Control (via Neve Pro) – categories like Internal are paired with role-based visibility rules, so that only the right user roles (Admins/Editors) can see them.

    This double-layer ensures that internal posts never appear to unauthorized users—even if a category is accidentally shown somewhere else.


    Step-by-Step: Setting Up Internal Posts

    1. Create or Edit a Post
      • Go to WordPress Dashboard → Posts → Add New (or edit an existing post).
    2. Assign the Category “Internal”
      • In the Categories panel, check the box for Internal.
      • This automatically applies Neve Pro’s role-based restriction so that only Editors and Administrators can see the post.
    3. Adjust Visibility Settings
      • In the Post Visibility section:
        • Select Private (recommended).
        • This ensures only logged-in Editors and Admins can see the post, even if shared accidentally.
    4. Publish
      • Once saved, the post will not appear to Guests, Subscribers, or other roles.
      • Test this by opening an Incognito window (logged out) — you should not see the post.

    Best Practices

    • Always tag “Internal” posts properly.
    • Use Private visibility in combination with the category restriction for an extra safeguard.
    • If a post should later become public, remove the “Internal” category and change visibility back to Public.

    ❓ FAQs About WP Visibility & Internal Posts

    1. “I marked the post as Internal, but I can still see it when logged out. Why?”

    • Check if the post is also set to Private. Category control works with logged-in users, but the Private visibility is what blocks logged-out views.

    2. “Why can Editors see Internal posts but not Authors or Contributors?”

    • That’s intentional. Only Editors and Administrators have clearance for Internal content. Authors and Contributors should not.

    3. “Can I share an Internal post link with someone outside the team?”

    • No. Even with the link, unless they are logged in with Editor/Admin permissions, the post will not load.

    4. “What happens if I forget to set the category to Internal but mark a post as Private?”

    • It will still be hidden from the public, but it won’t benefit from Neve Pro’s role-based content control. Always use both for maximum safety.

    5. “Do I need to change anything in Neve Pro settings when creating Internal posts?”

    • No. Neve Pro already has role rules in place for the Internal category. You only need to apply the category and set visibility.

    6. “I can’t edit visibility settings on a post. Why?”

    • You may not have Editor or Administrator rights. Ask an Admin to update your role if needed.

    7. “Will Internal posts show up in Google search results?”

    • No. Posts set to Private are excluded from indexing. Internal posts are invisible to search engines.